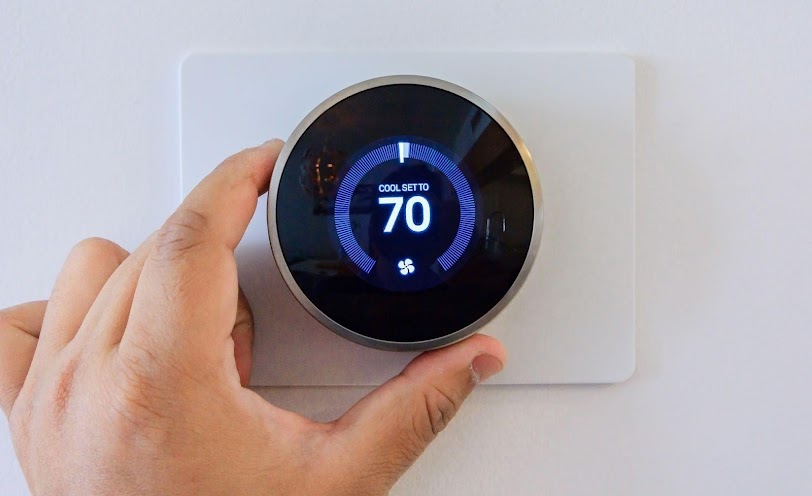
Smart thermostats are revolutionizing the way we control the heating and cooling of our homes. These innovative devices offer advanced features and connectivity options that provide homeowners with greater control over their HVAC systems. Unlike traditional thermostats, smart thermostats can be controlled remotely through smartphone apps or integrated with voice assistants, making it easier than ever to manage your home’s temperature.
Smart thermostats utilize cutting-edge technology to learn your preferences and create personalized temperature schedules. By analyzing your heating and cooling patterns, they can automatically adjust settings to maximize comfort and energy efficiency. These devices often come equipped with sensors and algorithms that optimize energy consumption, resulting in potential cost savings on your utility bills.
Benefits of Installing a Smart Thermostat
Installing a smart thermostat in your home offers a wide range of benefits. Here are a few advantages to consider:
Energy Efficiency:
Smart thermostats are designed to optimize energy usage by adjusting temperature settings based on occupancy patterns and external factors like weather conditions. This can help minimize energy waste and reduce your carbon footprint.
Cost Savings:
By efficiently managing your heating and cooling systems, smart thermostats can potentially lower your energy bills. The ability to customize temperature schedules and remotely control your thermostat allows you to avoid unnecessary heating or cooling when you’re away from home.
Convenience and Comfort:
With remote access and intelligent programming capabilities, smart thermostats provide convenience and enhanced comfort. You can easily adjust the temperature settings from anywhere using your smartphone or voice commands, ensuring your home is always at the desired temperature when you arrive.
Learning Capabilities:
Smart thermostats utilize machine learning algorithms to understand your temperature preferences and automatically create personalized schedules. Over time, they learn your habits and adjust settings accordingly, providing a comfortable environment without the need for manual adjustments.
Integration with Smart Home Systems:
Smart thermostats often integrate seamlessly with other smart home devices, such as voice assistants, home automation systems, and roller shutters. This integration allows for a unified control experience, where you can manage multiple aspects of your home with a single command or through a centralized app.
By installing a smart thermostat, you can enjoy the convenience, energy efficiency, and cost savings that come with advanced temperature control. In the following sections, we will guide you through the process of preparing for installation, the step-by-step installation guide, troubleshooting common issues, and maximizing the potential of your smart thermostat.
Pre-Installation Preparation
Before diving into the installation process of a smart thermostat, it’s important to properly prepare and assess your HVAC system compatibility. Additionally, gathering the necessary tools and materials will ensure a smooth and efficient installation process.
Assessing Your HVAC System Compatibility
To determine if your HVAC system is compatible with a smart thermostat, there are a few key factors to consider:
- Voltage Requirements: Smart thermostats typically require a low-voltage system, commonly known as a “24-volt system.” Ensure that your HVAC system operates on this voltage to ensure compatibility.
- System Type: Identify the type of HVAC system you have, such as a forced-air system, heat pump, or boiler system. Smart thermostats are designed to work with specific system types, so it’s crucial to choose a compatible thermostat.
- Wiring Compatibility: Take note of the wiring configuration of your existing thermostat. Most smart thermostats require a “C-wire” or “common wire” for power. If your current setup lacks a C-wire, you may need to use alternative methods like a power extender kit or consult a professional for assistance.
- Compatibility Check: Check the smart thermostat manufacturer’s website or consult the product manual to verify if your HVAC system is compatible with their specific model. Manufacturers often provide compatibility tools or lists to assist in this process.
By assessing your HVAC system compatibility, you can ensure that the smart thermostat you choose will work seamlessly with your existing system. If you need assistance or have questions, consider consulting a professional HVAC technician.
Gathering the Necessary Tools and Materials
Before beginning the installation process, gather the following tools and materials to ensure a hassle-free experience:
| Tools | Materials |
|---|---|
| Screwdriver (Phillips and flathead) | Smart thermostat (with mounting hardware) |
| Drill (if required for mounting) | Mounting plate (if needed) |
| Level | Wire labels (if provided with the thermostat) |
| Pliers | Wire nuts (if required) |
| Wire stripper | HVAC system manual |
| Voltage tester (for safety) | User manual for the smart thermostat |
Having these tools and materials readily available will save you time and prevent delays during the installation process. Ensure that you have a clear understanding of the instructions provided by the smart thermostat manufacturer before proceeding.
In the next section, we will provide a step-by-step installation guide, covering the process of turning off power, removing the old thermostat, mounting and wiring the smart thermostat, connecting to Wi-Fi, and configuring settings. Stay tuned to make your smart thermostat installation a success!
Step-by-Step Installation Guide
Installing a smart thermostat can bring convenience and energy efficiency to your home. While the process may seem daunting, it can be easily accomplished by following a step-by-step guide. Here’s a breakdown of the installation process:
Turning off Power and Removing the Old Thermostat
- Start by turning off the power to your HVAC system from the circuit breaker to ensure safety during the installation process.
- Remove the cover of the old thermostat by gently pulling it away from the wall. You may need to unscrew any screws holding it in place.
- Take note of the existing wiring connections. Label each wire according to its corresponding terminal (e.g., R, C, W, Y) to ensure proper reconnection later.
- Carefully disconnect the wires from the terminals. If the wires are connected using screws, loosen them to release the wires. If they are connected using a plug or clip, simply disconnect them.
- Once the wires are disconnected, remove the old thermostat from the wall by unscrewing any mounting screws.
Mounting and Wiring the Smart Thermostat
- Position the mounting plate of the smart thermostat on the wall at the desired location. Use a level to ensure it is straight.
- Mark the positions of the screw holes on the wall and drill pilot holes if necessary.
- Secure the mounting plate to the wall using screws or other provided mounting hardware.
- Refer to the manufacturer’s instructions to identify the appropriate terminals for each wire. Connect the wires to the corresponding terminals on the smart thermostat.
- Ensure that the wires are firmly connected to the terminals, avoiding any loose connections that could affect the functionality of the thermostat.
Connecting to Wi-Fi and Configuring Settings
- Power on your HVAC system by turning on the circuit breaker.
- Follow the manufacturer’s instructions to power on the smart thermostat.
- Connect the smart thermostat to your home’s Wi-Fi network by following the prompts on the thermostat’s display. This step may require entering your Wi-Fi password.
- Once connected to Wi-Fi, download the companion mobile app or access the manufacturer’s online portal to complete the registration and configuration process.
- Configure the desired settings on the app or online portal, such as temperature preferences, scheduling, and any additional features specific to your smart thermostat model.
By following these step-by-step instructions, you can successfully install a smart thermostat in your home. If you encounter any issues during the installation process, consult the manufacturer’s documentation or reach out to their customer support for assistance. Enjoy the benefits of an efficient and automated home climate control system!
Troubleshooting and Common Issues
Installing a smart thermostat can bring convenience and energy efficiency to your home, but like any electronic device, it may encounter issues from time to time. In this section, we will discuss some common troubleshooting steps to ensure proper functionality, address connectivity problems, and troubleshoot other potential issues that may arise.
Ensuring Proper Functionality
Before diving into any troubleshooting steps, it’s important to ensure that your smart thermostat is functioning properly. Here are a few checks to perform:
- Power Source: Confirm that your smart thermostat is receiving power. Check if the display is illuminated and responsive.
- HVAC Compatibility: Make sure your smart thermostat is compatible with your heating, ventilation, and air conditioning (HVAC) system. Refer to the manufacturer’s specifications or consult a professional if needed.
- Wiring Connections: Double-check that the wiring connections are secure and correctly installed. Verify that each wire is firmly connected to its respective terminal.
- Sensor Placement: Ensure that the thermostat’s sensor is not obstructed and is located in an area that accurately reflects the temperature of your home.
If everything appears to be in order but your smart thermostat still isn’t functioning correctly, consult the manufacturer’s troubleshooting guide or contact their customer support for further assistance.
Addressing Connectivity Problems
Connectivity issues can prevent your smart thermostat from communicating with your home’s Wi-Fi network or the associated mobile app. Here are some steps to address connectivity problems:
- Wi-Fi Signal Strength: Check the Wi-Fi signal strength in the location where your smart thermostat is installed. Weak signals can lead to intermittent connectivity. Consider moving the router closer to improve signal strength or using a Wi-Fi range extender.
- Network Settings: Ensure that you have entered the correct Wi-Fi network name (SSID) and password during the initial setup. Recheck the settings and update them if necessary.
- Router Configuration: Some routers have specific settings that may interfere with the connectivity of smart devices. Refer to your router’s user manual or contact your internet service provider for assistance with router configuration.
- Firmware Updates: Check if there are any firmware updates available for your smart thermostat. Updating to the latest firmware can often resolve connectivity issues.
If you continue to experience connectivity problems, consult the manufacturer’s support resources for further guidance.
Troubleshooting Other Potential Issues
In addition to functionality and connectivity issues, you may encounter other common problems with your smart thermostat. Here are a few troubleshooting steps for these issues:
- Inaccurate Temperature Readings: If your smart thermostat is displaying inaccurate temperature readings, ensure that the sensor is clean and free from dust or debris. You can gently clean it with a soft cloth.
- Unresponsive Touchscreen: If the touchscreen is unresponsive, try restarting the thermostat or removing and reinserting the batteries, if applicable. If the problem persists, contact the manufacturer for further assistance.
- Erratic Behavior: If your smart thermostat behaves erratically or doesn’t follow the programmed schedule, review the programming settings to ensure they are accurately set. Resetting the thermostat to its factory defaults and reprogramming it may also help resolve the issue.
If these troubleshooting steps do not resolve the problem, consult the manufacturer’s support resources or consider seeking professional assistance.
By following these troubleshooting steps, you can address common issues that may arise when installing and using a smart thermostat. Remember to refer to the manufacturer’s documentation and support resources for specific guidance related to your smart thermostat model.
Maximizing the Potential of Your Smart Thermostat
After successfully installing your smart thermostat, there are several ways to maximize its potential and make the most out of this advanced home automation device. Let’s explore some of the key aspects you should consider: exploring advanced features and programming options, integrating with other smart home devices, and maximizing energy efficiency and cost savings.
Exploring Advanced Features and Programming Options
Smart thermostats come equipped with a range of advanced features and programming options that allow you to have precise control over your home’s heating and cooling systems. Take the time to familiarize yourself with the specific features offered by your smart thermostat model, as they may vary.
One common feature is the ability to create customized temperature schedules. This allows you to program different temperature settings throughout the day to match your lifestyle and preferences. For example, you can set the thermostat to lower the temperature while you’re away at work and have it automatically increase before you return home.
Some smart thermostats also offer geofencing capabilities, which use your smartphone’s location to determine when you’re near or away from home. This feature can automatically adjust the temperature based on your proximity, ensuring optimal comfort and energy savings.
Integrating with Other Smart Home Devices
To truly harness the power of your smart thermostat, consider integrating it with other smart home devices. Many smart thermostats are compatible with popular smart home platforms, such as Amazon Alexa, Google Assistant, or Apple HomeKit.
By connecting your smart thermostat with other devices, you can create a seamless and interconnected smart home ecosystem. For example, you can use voice commands to adjust the temperature, or have your thermostat automatically adjust based on data from other devices, such as motion sensors or door/window sensors. This integration allows for enhanced convenience and automation in managing your home’s climate control.
Maximizing Energy Efficiency and Cost Savings
One of the key benefits of a smart thermostat is its potential to maximize energy efficiency and reduce your energy bills. Here are a few tips to help you achieve this:
- Utilize the energy-saving modes: Most smart thermostats offer energy-saving modes, such as eco or away mode. These modes adjust the temperature settings to conserve energy when you’re not at home or during periods of low activity.
- Take advantage of temperature setbacks: Use the scheduling features to set lower or higher temperatures during sleeping hours or when you’re away. This simple adjustment can lead to significant energy savings over time.
- Monitor your energy usage: Many smart thermostats provide energy usage reports that allow you to track and analyze your energy consumption. Use this data to identify patterns and make informed decisions to optimize your energy usage.
- Consider smart features like occupancy detection: Some smart thermostats use occupancy sensors to detect whether a room is occupied. This helps in avoiding unnecessary heating or cooling of unoccupied spaces.
By implementing these strategies, you can leverage the intelligence of your smart thermostat to not only enhance your comfort but also reduce your environmental impact and save on energy costs.
Now that you’ve explored the advanced features, integration possibilities, and energy-saving tips, you can maximize the potential of your smart thermostat. Enjoy the convenience, comfort, and efficiency that this innovative device brings to your home.


I like how you mentioned that you can control a smart thermostat with a computer, phone, or tablet. I would imagine that some people get a high energy bill because they go on vacation and forget to adjust their thermostats before they leave. Having a smart thermostat system would allow you to prevent this kind of situation from occurring.
Yup, Exactly!