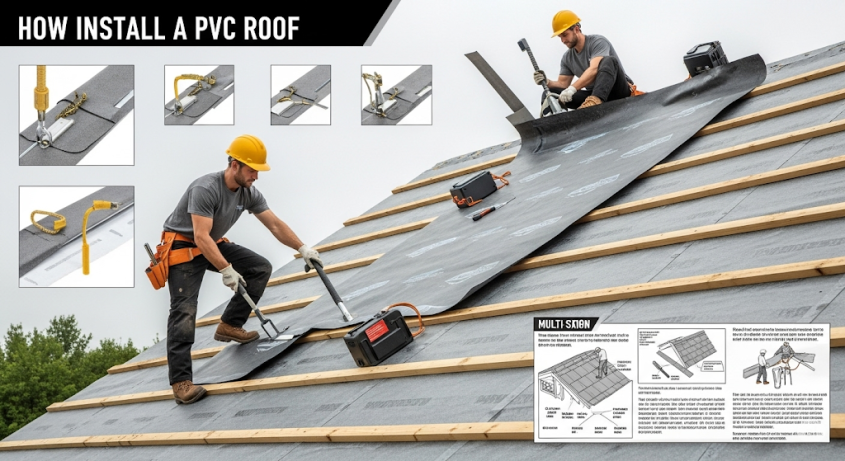
There’s something satisfying about taking on a project yourself, especially when it’s something that protects your home every single day. A roof isn’t just another part of your building. It’s the shield that keeps rain out, holds up against heat, and keeps you comfortable. Thinking about PVC roof installation might feel like a big leap. You’re not alone. Many people pause, wondering if it’s too much to handle. The good news? If you break it down step by step, it’s manageable. First, you clean the surface. Then you lay down the underlayment. After that, you measure and cut your membrane. Next, you weld your seams. The final step is sealing everything the right way. Let’s go through each part.
Here Are The 5 Steps You Need to Follow to Install a PVC Roof
Let’s go through what you need to know. This way, you can get started without confusion.
1. Clean and Prep Your Roof Deck
Don’t rush your roof project. It all starts with having a clean deck. Dirt, dust, and scraps from old materials can get in the way. So, grab your broom and sweep everything out. Check for stray nails or screws that might poke holes later. Look over your deck for any loose boards or soft spots. Fix these now before you move to the next step. It’s easier to take an extra hour fixing a squeaky board now. That’s better than dealing with a hidden leak later. Let the deck dry fully. This way, your PVC will stick properly, and you’ll avoid bubbles that weaken your roof. Also, take a moment to visualize the layout before moving forward. It helps you catch anything you might have missed.
2. Install the Underlayment Properly
Underlayment is your quiet helper. It keeps moisture out and helps your PVC membrane sit flat. This gives you a smooth surface to work with. Lay out your insulation boards carefully, lining them up without leaving gaps. Gaps can create dips that lead to puddles. That’s not something you want on your roof. Use the fasteners recommended by your manufacturer to keep the boards secure. Press down the edges that pop up. Double-check that your surface is even before you move on. Aside from moisture protection, underlayment also helps with temperature control. It keeps your building cooler in summer. Take your time here. A flat, secure base is what gives your PVC roof its strength later.
3. Measure and Cut Your PVC Membrane
Unroll your PVC membrane and let it sit so it flattens out. This makes it easier to handle. Grab your tape measure and get your exact dimensions. Add a few extra inches for overlaps. Mark your lines clearly so you don’t get confused while cutting. Use a sharp knife and take your time for cleaner edges. It helps your seams fit well when you weld later. Before you start welding, place the pieces on the roof to see how they fit around vents and corners. This way, you can adjust without stress. Careful measuring and cutting help you avoid waste and save material. It also sets you up for a smoother, easier weld.
Read Also >>> Metal Sheds Unveiled: A Complete Guide for Homeowners
4. Weld the Seams Securely
Welding is the step that locks everything together. Line up your seams so they overlap evenly. About two inches is common. Using a hot air welder, heat the seams while pressing them down with a roller. Work at a steady pace, moving in a straight line. Don’t rush. Don’t go too slow either, as it can damage the material. After welding, use a seam probe to check for any gaps or weak spots. If you find them, reheat and press down again to seal them fully. This step is where your PVC membrane becomes a single, waterproof layer. Honestly, it’s a bit satisfying to watch the pieces fuse together. You know it’s going to keep water out for years. Take your time here, and check your work as you go.
5. Seal Edges and Flashing Points
Edges and flashing are often where water tries to sneak in. This is why sealing them properly is non-negotiable. Start with termination bars along the roof edges, pressing the PVC membrane down securely. Fasten these bars with screws to lock your membrane in place. For corners, vents, and pipes, you may need to cut custom patches of PVC. Weld these patches around each penetration point, pressing them down to remove any air pockets. Additionally, apply a PVC-compatible sealant to add extra protection around tricky spots. Don’t rush. Check each area twice to ensure there are no gaps. This way, your roof will stay strong during heavy rain and high winds. It gives you peace of mind every time you hear a storm rolling in.
Conclusion
Thinking about handling PVC roof installation yourself? It is doable if you take your time and follow each step carefully. Start by cleaning your roof deck so it’s clear and ready. Then, add your underlayment to build a strong, even base for your membrane. Next, measure and cut your PVC neatly. This way, your pieces fit just right. Weld your seams carefully so your roof becomes one solid, leak-proof layer. Finish by sealing the edges and flashing to keep your home protected. Step by step, you can build a roof that handles rain and heat for years to come. But if you ever feel stuck, feel free to call in professionals. They can help you finish your PVC roofing project smoothly and skillfully.


